BME280 Sensor Driver


Interfacing a Bosch BME280 digital sensor module (capable of sensing temperature, humidity and pressure) in Python 2 or 3 using I2C on the Raspberry Pi. The particular kit I bought can be acquired for a few pounds from eBay. Further technical details for the BME280 sensor can be found in the datasheet [PDF].
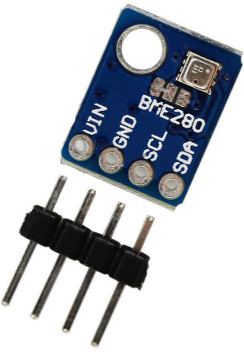
GPIO pin-outs
The BME280 is an I2C device, so connecting to the RPi is very straightforward:
P1 Header
For prototyping, the P1 header pins should be connected as follows:
| Board Pin | Name | Remarks | RPi Pin | RPi Function |
|---|---|---|---|---|
| 1 | VIN | +3.3V Power | P01-1 | 3V3 |
| 2 | GND | Ground | P01-6 | GND |
| 3 | SCL | Clock | P01-5 | GPIO 3 (SCL) |
| 4 | SDA | Data | P01-3 | GPIO 2 (SDA) |
Pre-requisites
Ensure that the I2C kernel driver is enabled:
$ dmesg | grep i2c
[    4.925554] bcm2708_i2c 20804000.i2c: BSC1 Controller at 0x20804000 (irq 79) (baudrate 100000)
[    4.929325] i2c /dev entries driver
or:
$ lsmod | grep i2c
i2c_dev                 5769  0
i2c_bcm2708             4943  0
regmap_i2c              1661  3 snd_soc_pcm512x,snd_soc_wm8804,snd_soc_core
If you have no kernel modules listed and nothing is showing using dmesg then this implies
the kernel I2C driver is not loaded. Enable the I2C as follows:
- Run
sudo raspi-config - Use the down arrow to select
9 Advanced Options - Arrow down to
A7 I2C - Select yes when it asks you to enable I2C
- Also select yes when it asks about automatically loading the kernel module
- Use the right arrow to select the <Finish> button
- Select yes when it asks to reboot
After rebooting re-check that the dmesg | grep i2c command shows whether
I2C driver is loaded before proceeding.
Optionally, to improve permformance, increase the I2C baudrate from the default
of 100KHz to 400KHz by altering /boot/config.txt to include:
dtparam=i2c_arm=on,i2c_baudrate=400000
Then reboot.
Then add your user to the i2c group:
$ sudo adduser pi i2c
Install some packages:
$ sudo apt-get install i2c-tools python-pip
Next check that the device is communicating properly (if using a rev.1 board, use 0 for the bus not 1):
$ i2cdetect -y 1
       0  1  2  3  4  5  6  7  8  9  a  b  c  d  e  f
  00:          -- -- -- -- -- -- -- -- -- -- -- -- --
  10: -- -- -- -- -- -- -- -- -- -- -- -- -- -- -- --
  20: -- -- -- -- -- -- -- -- -- -- -- -- -- -- -- --
  30: -- -- -- -- -- -- -- -- -- -- -- -- -- -- -- --
  40: -- -- -- -- -- -- -- -- -- -- -- -- -- -- -- --
  50: -- -- -- -- -- -- -- -- -- -- -- -- -- -- -- --
  60: -- -- -- -- -- -- -- -- -- -- -- -- -- -- -- --
  70: -- -- -- -- -- -- 76 --
Installing the Python Package
For python2, from the bash prompt, enter:
$ sudo python setup.py install
This will install the Python files in /usr/local/lib/python2.7
making them ready for use in other programs.
Alternatively for python3, type:
$ sudo python3 setup.py install
Cheeseshop install
Alternatively, a version on PyPi is available, just do:
$ sudo pip install RPi.bme280
Software Driver - Example Usage
Once installed, confirm the I2C address (see prerequisites, it will most likely be 0x76 or 0x77) and port.
Then in a python script or REPL:
import smbus2
import bme280

port = 1
address = 0x76
bus = smbus2.SMBus(port)

calibration_params = bme280.load_calibration_params(bus, address)

# the sample method will take a single reading and return a
# compensated_reading object
data = bme280.sample(bus, address, calibration_params)

# the compensated_reading class has the following attributes
print(data.id)
print(data.timestamp)
print(data.temperature)
print(data.pressure)
print(data.humidity)

# there is a handy string representation too
print(data)
This then should print something like:
ee50df9c-3aa3-4772-8767-73b6bb74f30f
2016-11-18 17:33:28.937863
20.563
980.91
48.41
compensated_reading(id=ee50df9c-3aa3-4772-8767-73b6bb74f30f,
    timestamp=2016-11-18 17:33:28.937863, temp=20.563 °C,
    pressure=980.91 hPa, humidity=48.41 % rH)
For a data-logger like application, periodically call bme2.sample(bus, address, calibration_params) to
get time-based readings.
See the weatherstation project for a more complete example usage.
References
> TODO
License
The MIT License (MIT)
Copyright (c) 2016 Richard Hull
Permission is hereby granted, free of charge, to any person obtaining a copy of this software and associated documentation files (the “Software”), to deal in the Software without restriction, including without limitation the rights to use, copy, modify, merge, publish, distribute, sublicense, and/or sell copies of the Software, and to permit persons to whom the Software is furnished to do so, subject to the following conditions:
The above copyright notice and this permission notice shall be included in all copies or substantial portions of the Software.
THE SOFTWARE IS PROVIDED “AS IS”, WITHOUT WARRANTY OF ANY KIND, EXPRESS OR IMPLIED, INCLUDING BUT NOT LIMITED TO THE WARRANTIES OF MERCHANTABILITY, FITNESS FOR A PARTICULAR PURPOSE AND NONINFRINGEMENT. IN NO EVENT SHALL THE AUTHORS OR COPYRIGHT HOLDERS BE LIABLE FOR ANY CLAIM, DAMAGES OR OTHER LIABILITY, WHETHER IN AN ACTION OF CONTRACT, TORT OR OTHERWISE, ARISING FROM, OUT OF OR IN CONNECTION WITH THE SOFTWARE OR THE USE OR OTHER DEALINGS IN THE SOFTWARE.